Raised Beds Let You Grow More Crops In Smaller Area
Growing crops in raised beds is one of the very few garden techniques that have almost only advantages. From the first time I read about them I knew we'll want to build some. The saga with our first raised beds is another story which will be available in another post soon. Till then, let me share few things with you:
- What are their advantages and what makes them so efficient.
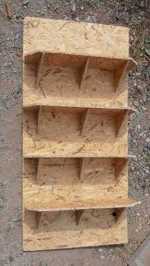
- What are the different materials you can use for making a raised bed.
- How to actually build one (in short) and how much it will cost.
- How you can improve them and turn them into small hoop houses.
- What to do so you can use them longer and with better results.
In case you don't know what a raised bed is, here is it in short. It's a garden bed raised 5-6 inches or more (up to a metter or so) above the ground. Looks like a bottom-less tray filled with soil. Usually the sides are made of wood but there are also ones made of bricks, concrete blocks, plastic, steel etc. See a couple of raised beds below:
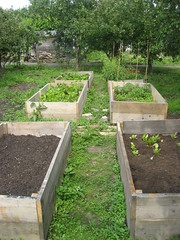
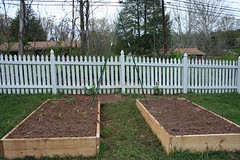
(Click on the pics to see them larger)
Known and Less Known Advantages of Raised Beds
So what's the deal? Why would you want to spend your time and build such a thing instead of growing your veggies in rows like everyone else? Here's why:
- Growing more crops on less space. This is one of the first reasons that made us think about raised beds. Our garden is not large, and large portions of the soil is not good (more on this in the next item). Raised beds let you grow plants closer to each other unlike in the rows gardening. Your walking area is outside of the bed so you don't need any space to step in (that also leads to benefits 3 and 4 below).
- You can place a bed over bad ground. In our garden we have areas with very compacted and poor soil, full with rocks, broken bricks and who knows what else. Digging this soil and cleaning it up for gardening is really hard task. But with a 15 inches high bed above such area will become usable because you can pour in better soil or compost. Dig as much as you can the soil at the bottom, drop some hay or straw and fill the top with good soil. This way the roots will have enough space to grow and not worry about the rocks and poor dirt at the bottom. So now unused area of your garden can turn into fertile bed. Technically you can even build the bed over a concrete slab, it just has to be high enough to allow roots to grow and to allow good drainage.
- Prevent compacting the soil. Because accidently stepping in the raised bed is unlikely (especially for the higher ones), and because you don't walk between the rows, the soil remains soft and not compacted. This is very important for the plants as roots can grow, breed and consume water and nutrients. Compare this to walking between rows in traditional gardening. You may step on a plant and even if you don't, you compact the soil between the rows which makes it poorer for the next harvest.
- Less weeds. Because plants grow much closer to each other they shadow the weeds. Don't expect to have no weeds at all, but you'll have less of them compared to traditional agriculture.
- Longer growing season. You may wonder why. The most important reason is that when the winter season approaches its end the sunlight warms the raised bed earlier than the soil which is entirely at ground level. So you can start seeding or transplanting seedlings earlier. In the Autumn the soil might cool earlier but this shouldn't be a problem for plants that are already growing fine.
- Less water required. This advantage comes mostly because of the less space used per plant. Most of the water you put in the raised bed becomes used. When watering a row garden a lot of the water gets wasted. Another reason for lower water waste is that the dense crops create more shadow and prevent moisture loss.
- Better drainage. Because the soild is not compacted, and is raised, the drainage of your bed is better. Random water won't be flowing over your bed, and any excess water drains out quickly.
- More soft soil for root vegetables. Raised beds are great for growing plants that have long roots. Turnips, carrots, beet, celery - all these plants should grow much better. So your harvest will be more abundant and of higher quality.
- Prevent soil erosion. Especially when combined with mulching and winter cover crops.
- Easier to keep some vermin and livestock away. We have big problems with snails here. Now the raised bed won't stop them but it will take some time for them to creep on the walls, and the chance they'd be interested in doing it is lower. Besides you can smear some preparation in 1-2 inches thick band on the outside wall to stop creeping vermit without poisoning the soil. Your chicken, dog, and even cats are unlikely to go inside the bed and damage the harvest as well.
- Easier to work on. Even 10 incheas above the ground is better than ground level when you have to weed, harvest, seed or transplant crops. And older or disabled people who can't bend can build higher raised beds and make their work much much easier.
- Easy to attach a hoophouse. Raised beds make great foundation for easy and frugal hoop house. See just one example.
- Looking good. A garden with rows looks like a barton. Nothing against bartons, but raised beds allow you to arrange your garden design with aestetics in mind, and can fit practically any type of backyard.
These are really a lot of good things to say. And there might be more that I have missed. Talking about disadvantages? I can think of barely any except that building the raised bed itself takes some time and costs some money.
So What Materials You Can Use?
The list can be long. Most raised beds are build with wooden boards. The problem is that most wood decays quickly. So you either need to varnish it while making sure you are not poisoning the soil or you need wood that can sustain decay for many years. Red wood, white oak, hedge are amongst the good choice. If such wood is not available, go our way. We started painting the boards and then will varnish them with yacht varnish. Once they dry out they should be safe to use (we hope!) and will stand long time (we hope). Finally you can simply replace wood when it decays but that's time consuming.
Other option could be concrete blocks or bricks. Such raised beds maybe won't look as good though. But it will survive nearly forever as there's no decay or anything. You may have to use some cement to keep the blocks together. Demounting such a bed can be quite a challenge if you ever decide to do it.
More extravagant and less popular also exist: steel or vinyl. For example using pipes placed horizontally can make affordable raised bed with decent look. Steel pipes will survive longer (vinyl ones will become fragile because of the sun).
Straw bales are nearly free and organic. They'll need to be replaced each year however and such a bed won't be very stable. Also the walls will be thick thus making the bed wider and harder to work in.
Finally you can just raise the soil, clean the grass around it and throw in some compost over it. This way you'll still get some of the advantages of the raised beds although it's going to be unstable and will lose its shape pretty fast.
How To Build One and How Much It Costs?
As I promised we'll publish the story of our garden beds when they are ready. So we don't have a guide on building bed yet, but instead I'm coming up with a selection of few good links:
- How to build a raised bed using lumber - this is a pretty standard one. Good guide with pics.
- Here's a cheap one using wood pallets (video). Please be very careful when considering wood pallets as they may contain toxic stuff.
- This is a really good one but it's going to take time and will be expensive. The guide is very good nevertheless.
- Here are beds made with concrete blocks.
- And with metal or even scrap metal.
All these guides assume you have access to good leveled ground and good soil. In our case we have to level the ground and use the very few good soil we have. More on this soon, and below.
Now, about the cost. It of course depends on the bed size, materials and height. Our first bed will cost about $30. It's 4ft / 1.2m wide and 9ft / 2.8m long. You should never make raised beds waiter than 3-4 ft, at most 5ft, because you have to be able to reach the middle with hand from both sides (so you never have to step in the bed). The length can be any. Our is 2.80m because the boards they sell here are 4m. So I wanted to use only 2 boards of 4m. The lumber for the bed costs about $15 (for 6in / 16cm high one), and then we used quite a lot of paint and varnish for the other $15. Now, 6in is OK but not great. It's better if you use 2 boards so you have more than 10 inches height. This will nearly double the costs.
Also, don't forget that you'll need to fill the beds with good soil. This can cost quite a lot if you are buying compost. Don't expect your kitchen leftover compost to do the work - you'll need a lot! I have some really frugal ideas about this but will share them when we test them first. So expect them in the post about our first raised beds.
How To Get More Out Of Your Raised Bed (Hint: Turn It Into a Hoophouse or Cold Frame)
Like already said, garden bed is a good foundation for building a hoop house. You can plug 4, 6 or 8 short pipes along the sides of the bed and attach them to the walls. Then in these pipes you can insert the bending plastic pipes and form the top. Then add the polythene and you are all set. There are few things to think about but that's going to come in another post.
If you can find used window frames you can quickly turn a raided bed into a cold frame as well. Just make sure there is enough space and air between the top of the soil and the window frame. Obviously this will work if your raised bed is at least 10 inches high. Turning it into a hoop house is usually a better solution but again it all depends on your conditions.
Here's another idea I have for our garden. We'll get two parallel raised beds and build a gable roof greenhouse over them, with a path in the middle. We don't have space for stand-alone greenhouse in the garden but building one on top of already existing garden beds sounds like a good solution. And there can be all kind of such ideas for your garden too.